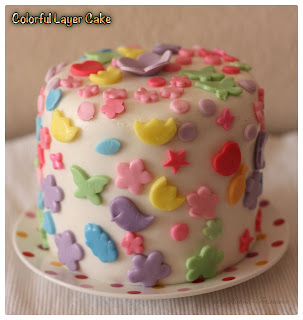
Colorful Layer Cake 彩色蛋糕
 |
| Colorful Layered Cake |
Baked this cake in early August 2012. The base cake is not chocolate flavored but rather vanilla flavored multi color layer ;-)
I have been baking substantial amount of chocolate cakes for the past few months (orders from customers). For a change, I would like to bake something "white" for that week and chose this cake as it looks so beautiful! Colorful Layer Cake or Rainbow Cake, was inspired by Kaitlin. The decorations was inspired by Darla.
This was my 1st attempt, yah, kinda excited too!..
I baked this cake in a smaller version i.e. 5 inch round pan, using only three pans as that's all I have in my store for 6 different color layer cake. Anyway, my oven is only able to fit three 5 inch round pans at one go. So, I reused the pans for another three layers.
This cake is a six layer cake with five layer fillings - the fillings is a very thin layer of buttercream. This is to ensure that my family members would not be able to taste something like a stick of butter but rather more of cake ;)
I was also planning to let my two angels to have some fun time after their pre-schooling - letting them decorate the cake together, guess it would be fun for them!..
Such a coincidence, one cake became two because it was so "tall" if I would stack it without halving each layer into half!.. When started to stack the cake layers, I could imaging it would be too "tall" as high as 6-inch or maybe higher and need to serve a slice of this cake on a very long plate.
Well, each layer was halved and it was just perfect for my two angels to decorate each cake on their own ;-)
|
|
I adapted the White Velvet Butter Cake recipe from Cake Bible (my favorite white cake ^^) and added food colors in making this cake. The cake layer filling is Lemony Mousseline Buttercream and covered with sugar paste.
The recipe is for an 8 inch two layer cake, I divided the batter evenly into six batches to have six cake layers into individual mixing bowl. Then, added the food color into each batter - red, orange, yellow, green, blur and purple.
 |
 |
| One toothpick color at a time |
 |
| Let the cake layers to cool completely.. |
Since I have only three round pans, I reused the pans once the 1st batch was baked. While the batter is "waiting", it can be refrigerated or leave it at room temperature as the baking time is about 25 to 28 minutes or less depending on oven. I baked mine for 28 minutes.
I adapted the White Velvet Butter Cake recipe from Cake Bible to make this Colorful Layer Cake.
Ingredients:
135g Large Egg Whites
242g Milk, divided into 60g and 182g (used Organic Soy Milk)
9g (2 ¼ teaspoons)Vanilla
300g Sifted Cake Flour (used 150g All Purpose Flour + 150g Cake Flour)
300g Sugar (used 280g Caster Sugar)
19.5g (1 tablespoon + 1 teaspoon) Baking Powder
5g (¾ teaspoon) Salt (used French Sea Salt)
170g Unsalted Butter, must be softened
Food Coloring (Red, Yellow, Orange, Green, Blue, Violet)
* Approximately Batter weight: 1136 grams (Refer note)
* Makes two 5-inch with 6 layer cakes
* Finished height: Each layer is approximately ¾ inches.
* Finished height: Each layer is approximately ¾ inches.
Prepare in advance:
- Make six 5-inch round cake pans greased, bottoms lined with parchment or wax paper, and then greased again and floured.
- 6 medium size of mixing bowls.
- Two 6 or 7-inch cake board (can be round or square) or serving plate
- A turn table or lazy susan
Method:
1. Preheat the oven to 350F (175c).
2. In a medium bowl lightly combine the egg whites, 60g milk and vanilla.
2. In a medium bowl lightly combine the egg whites, 60g milk and vanilla.
3. In a large mixing bowl combine the dry ingredients (flour, sugar, baking powder, and salt) and mix on low speed for 30 seconds.
4. Add the butter and remaining 182g milk. Mix on low speed until the dry ingredients are moistened. Increase to medium speed (high speed if using a hand mixer) and beat for 1 ½ minutes. Scrape down the sides.
4. Add the butter and remaining 182g milk. Mix on low speed until the dry ingredients are moistened. Increase to medium speed (high speed if using a hand mixer) and beat for 1 ½ minutes. Scrape down the sides.
5. Gradually add the egg mixture in 3 batches, beating for 20 seconds after each addition to incorporate the ingredients. Scrape down the sides.
6. Divide the batter between 6 bowls, approximately 189 grams each (should you followed the above ingredient volume).
7. Add in food colour with slightly less than ¼ teaspoon (or until desired shade is achieved) into each bowl. The color of the unbaked batter will be the color of the baked batter.
7. Add in food colour with slightly less than ¼ teaspoon (or until desired shade is achieved) into each bowl. The color of the unbaked batter will be the color of the baked batter.
8. Scrape each colored batter into the individual prepared pans and smooth the surface with a spatula.
9. Bake 18-20 minutes or until a tester inserted near the centre comes out clean and the cake springs back when pressed lightly in the centre. The cakes should start to shrink from the sides of the pans only after removal from the oven.
9. Bake 18-20 minutes or until a tester inserted near the centre comes out clean and the cake springs back when pressed lightly in the centre. The cakes should start to shrink from the sides of the pans only after removal from the oven.
10. Let the cakes cool in the pans on racks for 10 minutes. Invert the cakes onto greased wire racks. To prevent splitting, reinvert so that the tops are up and cool completely.
11. Using a serrated knife or a cake leveler, trim each of the cake top for flat top.
12. Measure the height of each cake, and halve each cake. Wrap each of the layer with cling wrap while waiting for filling. * Skip this step if you don't mind to have a very tall cake! ;)
13. Refrigerated the cake layers for about 30-minutes, as it will not get collapsed or crushed so easily. Also, it is much easier to frost the cake when it is solid.
13. Refrigerated the cake layers for about 30-minutes, as it will not get collapsed or crushed so easily. Also, it is much easier to frost the cake when it is solid.
|
|
Assembly:
1. Spread a little buttercream on the cake board or serving plate and set one layer on top. Slide a few wide strips of parchment paper or wax paper under the cake to keep the rim of the board/plate clean (pic.2).
2. Sandwich the layers in your preferred colour order with about 1 tablespoons of buttercream (appx. 15 grams).
3. Cover the top and sides with a thin layer of frosting (crumb-coating, pic.3 & 4), if using paper strips, slowly slide them out from under the cake. Then, refrigerated until set about 30 minutes before proceed for further decorations.
|
|
As for sugar paste decoration (after crumb-coated and refrigerated for about 30 minutes), get ready the white sugar paste (it needs approximately 250 grams each cake). Cover each cake with the sugar paste no thicker than 5 mm and proceed with further decorations.
Filling, crumb coating and frosting:
Lemony Mousseline Buttercream, or can be other fruity buttercream. Click here for Italian Meringue Buttercream or click here for Swiss Meringue Buttercream.
Note-to-self:
Sugar Paste Decorations:
Various shapes cut-out, multicolored.
1. Added 2-3 tablespoons of beetroot juice for red color batter, this is to reduce the use of red food coloring.
2. Batter weight will vary should you alter the ingredient volume, for instance, use 300g Sugar instead of 280g then you may get more cake batter. Thus, it's advisable to weigh your mixing bowl before adding ingredients and then subtract the weigh of the bowl from the final measurement after the batter is completed. Divide that number by six and add that weight of batter to each bowl.
3. Best to fill and frost the cakes when its chilled. The cake can get really heavy by the time you are adding from the 4th layer onwards. It will not collapsed or crushed so easily.
4. Extra buttercream can be kept up to six months frozen.
*Update @ 6 September 2012
- Unbaked batter can be at room temperature for as long as 1 hour! I just baked another one today and some extra for few cupcakes, will post it up soon.. ;)
- The above recipe is enough for one 5" round pan and 6 standard size of cupcakes
Happy Baking and Thank you for stopping by!..


Looks like a lot of work la !!! but I super like it - so colorful !!
ReplyDeleteToo pretty to even eat it ! :)
Khim
Hi Khim, thanks for the compliment :) agree that this cake kinda need lots of work especially the cleaning part. You may try making lesser layer, your favorite purple color maybe hehe
ReplyDelete